
Local installation and startup
This guide is for developers running RuoYi AI for the first time. Use your preferred editor and terminal to initialize the database, compile the Java backend, and start the admin and user frontends. Once these are running, configure a model for chat or add the services needed for a knowledge base.
Examples use Windows 11 and PowerShell, with repositories under D:/Project/github. Linux and macOS can use the same repository layout and service configuration, but local paths and shell syntax must be adapted. PowerShell environment-variable syntax cannot be copied directly into Bash.
1. Understand the programs you will start
1.1 The three repositories
| Repository | Purpose | Configuration and startup |
|---|---|---|
ruoyi-ai | Java backend for authentication, database access, and model calls. | application*.yml; build with Maven, then run with java -jar. |
ruoyi-admin | Admin frontend for models, knowledge bases, agents, and settings. | apps/web-antd; start with pnpm run dev:antd. |
ruoyi-web | User frontend for choosing models, chatting, and using applications. | .env.development; start with pnpm run dev. |
The backend repository also contains a directory named ruoyi-admin. This is the Java startup module, separate from the admin frontend repository. Each group of commands below specifies its working directory.
D:/Project/github/
├─ ruoyi-ai/                    Java 后端仓库
│  ├─ pom.xml                   后端的构建入口
│  ├─ ruoyi-admin/              Java 启动模块
│  │  └─ src/main/resources/    后端配置文件
│  ├─ ruoyi-common/             公共模块
│  ├─ ruoyi-modules/            业务模块
│  └─ docs/script/sql/          数据库脚本
├─ ruoyi-admin/                 管理端前端仓库
│  └─ apps/web-antd/
└─ ruoyi-web/                   用户端前端仓库
1.2 Required and optional services
| Program or service | Requirement | Address used in this guide |
|---|---|---|
| MySQL 8 | Required for accounts, settings, and application data. | 127.0.0.1:3306 |
| Redis | Required for caching and login sessions. | 127.0.0.1:6379 |
| Java backend | Required; shared by both frontends. | http://127.0.0.1:6039 |
| Admin frontend | Used to configure the system. | http://localhost:5666 |
| User frontend | Used for chat and applications. | http://localhost:5180 |
| Weaviate | Needed for local knowledge retrieval. | http://127.0.0.1:28080 |
| MinIO | Needed for local object storage. | API: 9000; console: 9090. |
Start MySQL, Redis, the backend, and both frontends first to verify login and configuration pages. Model services are configured separately. A model key is not needed to start the basic pages, but a cloud model answer cannot be verified without one. You do not need to configure email, web search, and media generation for the initial startup.
The user app uses 5180 here, leaving 5173 for the documentation site. If a port is occupied, choose a free port and update the corresponding connections.
2. Install development tools
2.1 Versions and downloads
Git, JDK, Maven, Node.js, and pnpm are needed to run from source. Install the database and cache locally or use Docker. Choose an editor and optional tools as needed.
| Tool | Purpose | Version or selection | Download or installation |
|---|---|---|---|
| Git | Download source code. | Current stable release. | Download |
| JDK | Compile and run Java. | JDK 21; the source targets Java 17. | Temurin JDK |
| Apache Maven | Download Java dependencies and build packages. | 3.9.x, Binary zip archive. | Download |
| Node.js | Run frontend development tools. | 24 LTS. | Download |
| pnpm | Install frontend dependencies and run scripts. | 10.14.0, matching the admin repository. | Installation; commands in section 2.4. |
| MySQL | Store accounts, settings, and application data. | 8.0; no separate local server needed when using Docker. | Windows installer |
| Redis | Cache and login sessions. | Compose uses 6.2; the local verification used the 8.2.3 Windows community port. | Windows community releases; Docker in section 4.1. |
| Docker Desktop / Engine | Run infrastructure services. | Must support docker compose and Linux containers. | Windows / Linux Engine |
| IntelliJ IDEA | Optional Java IDE. | Choose this, VS Code, or another editor. | Download |
| VS Code | Optional source and configuration editor. | Current stable release. | Download |
| Navicat for MySQL | Optional graphical database client. | Commercial software; a trial is available. | Download |
| MySQL Workbench | Optional graphical database client. | The MySQL command-line client also works. | Download |
| Ollama | Optional local models. | Install if you need local embeddings. | Windows / Other systems |
See section 11.1 for Weaviate and MinIO, and section 11.2 for the MinIO mc client. Compose downloads the configured container images automatically.
For a fresh installation, use pnpm 10.14.0 throughout. Choose a Node.js version that also satisfies tools such as Vite in the current repositories, rather than relying solely on minimum versions from older guides.
2.2 Install JDK and check terminal access
- Open Eclipse Temurin downloads, select Windows, x64, JDK, 21, and install the package. On ARM hardware, select the matching architecture.
- Keep Add to PATH enabled and select Set JAVA_HOME.
JAVA_HOMEpoints to the JDK directory, such asC:/Program Files/Eclipse Adoptium/jdk-21..., without/binat the end. - Close the old terminal, open a new PowerShell window, and run:
java -version
javac -version
$env:JAVA_HOME
java runs applications; javac compiles source code. Both version commands should show the installed JDK. If only java works, check whether you installed a JRE or whether PATH points to another Java installation. See Temurin installation on Windows.
If Java is still not recognized, search Windows for Edit the system environment variables → Environment Variables. Check JAVA_HOME and make sure Path contains %JAVA_HOME%\bin. Reopen the terminal after changes; keep existing Path entries.
2.3 Install Maven
- Download a 3.9.x Binary zip archive from Maven downloads. Choose the binary package rather than the source archive.
- Extract it to a permanent directory such as
D:/dev/apache-maven-3.9.12, and confirm thatbin/mvn.cmdexists. - Add its
bindirectory to Windows Path and reopen PowerShell. - Check the version and confirm Java version / runtime points to the JDK you installed.
mvn -versionBefore configuring Path, you can invoke the executable by its full path. In PowerShell, put & before a quoted executable path:
& 'D:\dev\apache-maven-3.9.12\bin\mvn.cmd' -versionMaven manages dependencies and builds Java projects. pom.xml describes dependencies and modules. Downloaded dependencies are usually cached in .m2/repository under your user directory; compiled output goes into each module's target directory. See Maven installation.
2.4 Install Node.js, pnpm, and Git
Install Node.js 24 LTS from the Node.js website and Git from Git downloads. Open a new terminal and run:
node -v
npm -v
git --version
npm install -g pnpm@10.14.0
pnpm -v
If pnpm is already installed, check its version. The admin repository currently pins pnpm@10.14.0 in packageManager; pnpm may switch versions automatically inside that repository. pnpm -v can therefore differ inside and outside the repository. See pnpm installation.
If PowerShell refuses to run pnpm.ps1 or npm.ps1, use pnpm.cmd or npm.cmd for the same command. You do not need to change the system script execution policy.
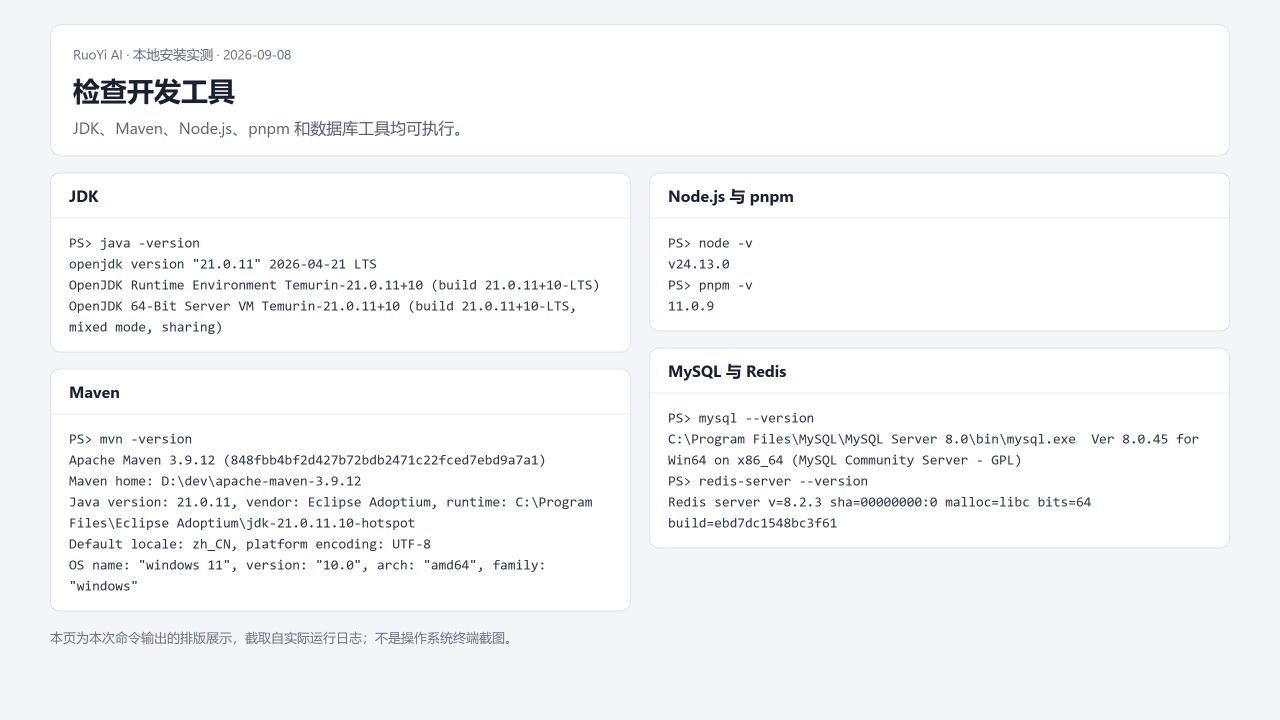
This image formats the recorded terminal output. Global pnpm was 11.0.9; inside the admin repository it was 10.14.0.
2.5 Prepare terminals and an editor
Use VS Code, IntelliJ IDEA, or another text editor. The entire initial startup can be done from the command line. Optional IDEA steps are under Open the backend in IDEA.
Open three PowerShell tabs for the backend, admin frontend, and user frontend. A running service keeps logging instead of returning a prompt. Closing its terminal or pressing Ctrl+C stops it.
3. Download the source code
Run these commands in PowerShell. If you do not have a D drive, use C:/Project/github and replace that path in later commands too:
New-Item -ItemType Directory -Force D:\Project\github | Out-Null
Set-Location D:\Project\github

git clone https://gitee.com/ageerle/ruoyi-ai.git
git clone https://gitee.com/ageerle/ruoyi-admin.git
git clone https://gitee.com/ageerle/ruoyi-web.git
Reuse existing checkouts instead of cloning them again. Keep the three repositories on compatible versions. When upgrading from an older version, also check incremental database scripts.
Check the download:
Test-Path D:\Project\github\ruoyi-ai\pom.xml
Test-Path D:\Project\github\ruoyi-admin\package.json
Test-Path D:\Project\github\ruoyi-web\package.json
All three results should be True. ZIP downloads may extract into an extra nested directory; run subsequent commands from the directory that actually contains pom.xml or package.json.
4. Prepare MySQL and Redis
4.1 Run infrastructure with Docker
If MySQL and Redis are not installed, use Docker. Install Docker Desktop for Windows, follow its instructions to prepare WSL 2, and wait for the engine to become ready.
docker version
docker compose version
docker info --format '{{.OSType}}'
docker version should report both Client and Server; the last command should return linux. If you only see a client version, commands hang, or the engine cannot be reached, resolve Docker startup before running containers.
Create a local configuration directory at the backend repository root:
Set-Location D:\Project\github\ruoyi-ai
New-Item -ItemType Directory -Force .dev | Out-Null
Download the infrastructure Compose file and save it as ruoyi-ai/.dev/compose.yml. It contains MySQL, Redis, and optional Weaviate and MinIO services. The backend and frontends still run from source. Keep its ports and database settings separate from the complete image deployment.
Create a file named .env in the same .dev directory with the two settings below. Replace the values with your local passwords; the MinIO password must have at least eight characters:
LOCAL_MYSQL_PASSWORD=REPLACE_WITH_YOUR_LOCAL_DATABASE_PASSWORD
LOCAL_MINIO_PASSWORD=REPLACE_WITH_YOUR_LOCAL_STORAGE_PASSWORD
Save the file as .env, not .env.txt. Add .dev to the repository's local Git exclusions because it holds local settings:
Add-Content .git/info/exclude "`n.dev/"Validate the configuration, then start only the two required services:
docker compose --env-file .dev/.env -f .dev/compose.yml config --quiet
docker compose --env-file .dev/.env -f .dev/compose.yml up -d mysql redis
docker compose --env-file .dev/.env -f .dev/compose.yml ps
docker exec ruoyi-local-redis redis-cli ping
The first command produces no output on success. Images are downloaded on first startup. Wait for MySQL and Redis to show Up / healthy; the last command should return PONG. At this point only the database and cache are running, not the Java backend.
To inspect initialization progress:
docker compose --env-file .dev/.env -f .dev/compose.yml logs --tail=80 mysql redisThis Compose file stores data in dedicated volumes that survive stop and start. Changing the initial MySQL password in .env does not change the account password in an existing volume. Existing instances retain their original password.
4.2 Use locally installed MySQL and Redis
You can reuse existing services. Confirm they are running and record the MySQL port, username, and password, and whether Redis requires a password. Skip containers for services you already have. For example, if only Redis is missing, use up -d redis in section 4.1.
Install MySQL 8.0 on Windows with the official installer. Enable TCP/IP, record the chosen port and root password, and configure MySQL as a Windows service. MySQL Workbench is only a graphical client; MySQL Server must still be installed and running.
For native Redis on Windows, download the community port from redis-windows releases and follow the package instructions. The recorded verification used 8.2.3. Alternatively, run Redis through Docker as in section 4.1.
If the local MySQL client is not on Path, invoke it by its full path:
& 'C:\Program Files\MySQL\MySQL Server 8.0\bin\mysql.exe' --protocol=TCP -h 127.0.0.1 -P 3306 -u root -p --default-character-set=utf8mb4-P specifies the port; -p prompts for a password. Password characters are not displayed as you type. The mysql> prompt means the database connection succeeded.
The recorded verification used separate MySQL 8.0.45 and Redis 8.2.3 processes on 13306 and 16379 to avoid existing services. On a free environment, use 3306 and 6379 as shown in this guide.
4.3 Handle occupied ports
Inspect listeners in PowerShell:
Get-NetTCPConnection -State Listen -ErrorAction SilentlyContinue |
  Where-Object { $_.LocalPort -in 3306,6379,6039,5666,5180 } |
  Select-Object LocalAddress,LocalPort,OwningProcess
First check whether an existing listener is the service you intend to use. For a separate Docker instance, change the left-side 3306 mapping to 13306, for example 127.0.0.1:13306:3306, then update the backend's database port to 13306. Apply the same principle to Redis and application ports; there is no need to terminate other projects' processes.
5. Initialize the database
5.1 Fresh installation: import the full SQL script
The verified script is:
ruoyi-ai/docs/script/sql/ruoyi-ai.sqlThe full script creates the ruoyi-ai and snail_job databases and includes DROP TABLE. Use it only for an empty instance or an environment you can rebuild. If you have existing data, follow Incremental upgrades. Adding a database name to the client command does not override USE statements inside the script and does not isolate the import into a different database.
For Docker MySQL from section 4.1: from the backend root, copy the SQL into the container and open its MySQL client:
docker cp .\docs\script\sql\ruoyi-ai.sql ruoyi-local-mysql:/tmp/ruoyi-ai.sql
docker exec -it ruoyi-local-mysql mysql -u root -p --default-character-set=utf8mb4
Enter the password from .dev/.env. At the mysql> prompt, run this SQL client command:
source /tmp/ruoyi-ai.sqlFor local MySQL: connect as described in section 4.2, then run:
source D:/Project/github/ruoyi-ai/docs/script/sql/ruoyi-ai.sqlUse the path accessible to the client running source. The container client reads /tmp/ruoyi-ai.sql; the local client reads D:/.... See MySQL batch commands.
The import prints Query OK messages and returns to mysql>. If an ERROR occurs, record the first error and line number and resolve it before starting the backend. Do not copy Bash's mysql < file.sql input redirection directly into PowerShell.
5.2 Check the database and required columns
Continue at the mysql> prompt:
SHOW DATABASES;
USE `ruoyi-ai`;
SHOW TABLES;
SELECT user_id, user_name, status FROM sys_user WHERE user_name = 'admin';
SHOW COLUMNS FROM knowledge_attach LIKE 'file_hash';
SHOW COLUMNS FROM knowledge_fragment LIKE 'fid';
Check for application tables, the admin account, and the file_hash and fid columns. The database name contains a hyphen, so quote it with backticks in SQL, as in the USE statement above.
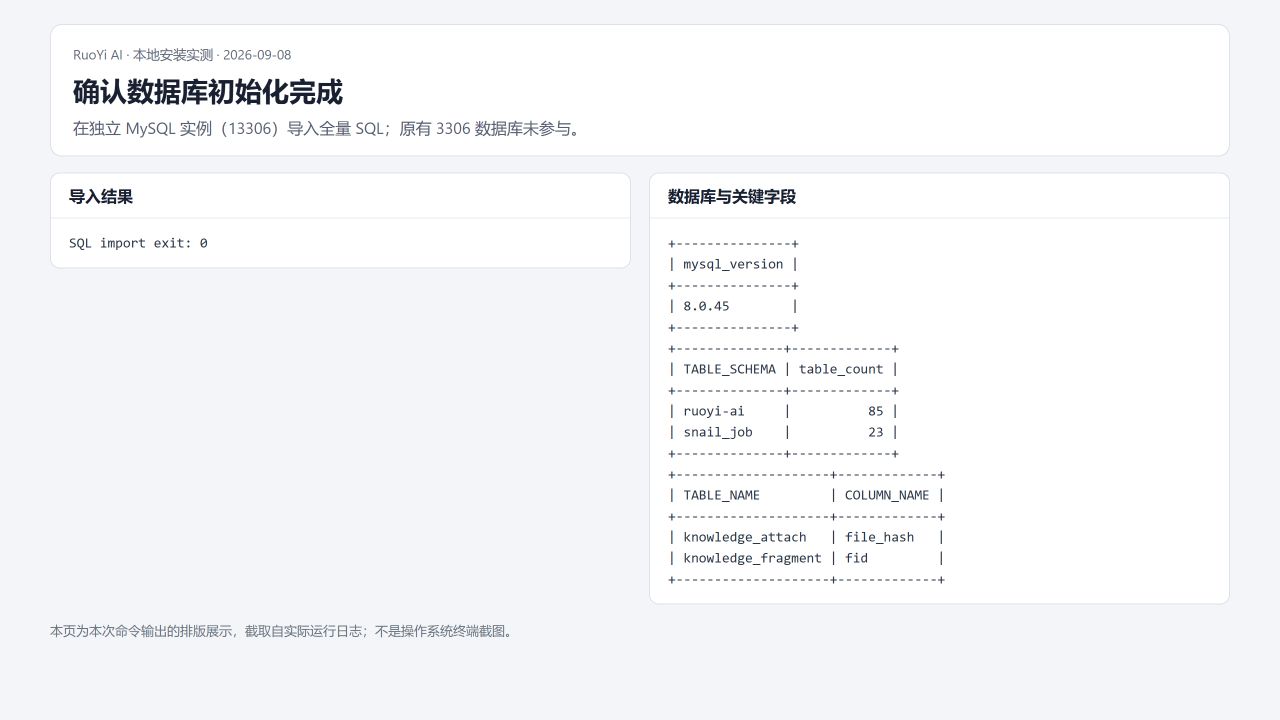
The recorded import produced 85 tables in ruoyi-ai and 23 in snail_job. Counts may change by version; also check accounts, required fields, and the features you use. Initial data includes examples, so existing models or demonstration sessions on first login are expected.
Type exit to return to PowerShell.
5.3 Existing databases: apply version-specific migrations
Back up the database and retain the running code version and configuration before upgrading. Inspect the backend's incremental scripts:
Set-Location D:\Project\github\ruoyi-ai
Get-ChildItem .\docs\script\sql\update\*.sql | Sort-Object Name
Read the applicability notes at the top of each script and apply only missing migrations. Do not replay every SQL file indiscriminately. The full initialization script already incorporates some historical migrations, while later features may need additional migrations.
For example, if an older database lacks RAG metadata, run this in the local MySQL client:
USE `ruoyi-ai`;
source D:/Project/github/ruoyi-ai/docs/script/sql/update/2026-07-20-knowledge-fragment-fid.sql
With Docker, copy the migration into the container using docker cp, then source its container path. Recheck the columns afterward. Unknown column 'file_hash' is a schema problem; rebuilding Java or restarting the frontend will not create the column.
6. Configure backend connections
6.1 Locate the configuration files
Open these files in the backend repository:
ruoyi-ai/ruoyi-admin/src/main/resources/application.yml
ruoyi-ai/ruoyi-admin/src/main/resources/application-dev.yml
application.yml contains shared settings; application-dev.yml contains development settings. Spring Boot merges them at startup. dev is the environment name explicitly selected by the startup command below.
For the initial setup, focus on MySQL, Redis, and ports. Monitoring, SnailJob, and email services can remain disabled for basic local startup.
6.2 Create a local override file
Create application-local.yml under the backend's .dev directory. If you skipped Docker setup, first create the directory with New-Item -ItemType Directory -Force .dev. Add the following settings. This is an external file loaded by a startup argument; you do not need to switch the active profile to local.
server:
  port: 6039

spring:
  datasource:
    dynamic:
      datasource:
        master:
          url: jdbc:mysql://127.0.0.1:3306/ruoyi-ai?useUnicode=true&characterEncoding=utf8&useSSL=false&serverTimezone=Asia%2FShanghai&allowPublicKeyRetrieval=true&nullCatalogMeansCurrent=true
          username: root
          password: "REPLACE_WITH_YOUR_LOCAL_DATABASE_PASSWORD"
  data:
    redis:
      host: 127.0.0.1
      port: 6379
      database: 0

spring.boot.admin.client:
  enabled: false

snail-job:
  enabled: false

sys:
  upload:
path: D:/Project/github/ruoyi-ai/.dev/uploads- Use the actual MySQL password. With the tutorial Compose file, it matches
LOCAL_MYSQL_PASSWORDin.dev/.env; Java does not automatically read that Compose.env. - Use spaces for YAML indentation. Replace the example password and paths. Forward slashes are convenient for Windows paths.
- If Redis has no password, omit
password. Do not usepassword: "": the recorded verification found that this triggers empty-password authentication and prevents startup. - If Redis requires authentication, add the correct
passwordunderspring.data.redis. Also check the original development settings and environment variables for an old password. - Java runs on the host in this guide, so it connects to mapped ports through
127.0.0.1. If Java also runs in Docker, use container-network service names as described in Docker deployment.
Check that the file was not saved as .yml.txt:
Get-Item .\.dev\application-local.ymlExclude password settings in .dev from Git as described in section 4.1. Editing src/main/resources/application-dev.yml directly requires rebuilding the JAR. Changes to the external override file only require a Java restart.
7. Build and start the Java backend
7.1 Build from the backend root
In the PowerShell tab reserved for the backend, run:
Set-Location D:\Project\github\ruoyi-ai
mvn -pl ruoyi-admin -am "-Dmaven.test.skip=true" package| Argument | Meaning |
|---|---|
-pl ruoyi-admin | Build the backend startup module. |
-am | Also build the modules it depends on. |
-Dmaven.test.skip=true | Skip test compilation and execution for this installation. Run relevant tests separately when developing changes. |
package | Compile and create the package. |
The first build downloads many dependencies; duration depends on network access and the cache. Repeated Downloading messages do not mean it is stuck. Wait for BUILD SUCCESS, then check the output:
Get-Item .\ruoyi-admin\target\ruoyi-admin.jarThis JAR contains the dependencies needed to start; no separate Tomcat installation is required. Do not run .jar.original or treat a source ZIP as a JAR.
If the build ends with BUILD FAILURE, resolve the first [ERROR]. Running java -jar without a successful build only produces follow-up errors such as an inaccessible JAR. See Troubleshooting for dependency download issues.
7.2 Start the JAR
Stay at the backend repository root and leave this terminal running:
java "-Dfile.encoding=UTF-8" -jar .\ruoyi-admin\target\ruoyi-admin.jar --spring.profiles.active=dev --spring.config.additional-location=file:./.dev/application-local.yml--spring.profiles.active=dev selects development settings. --spring.config.additional-location=... loads the local override. Its path is relative to the current directory, so do not change into target before using this command.
Startup connects to MySQL and Redis and loads application modules. Continue only after Started RuoYiAIApplication or the Chinese startup-success message appears and the process stays running. For APPLICATION FAILED TO START or Error starting ApplicationContext, read the cause that follows first.
7.3 Check the API from another terminal
$result = Invoke-RestMethod http://127.0.0.1:6039/auth/tenant/list
$result | ConvertTo-Json -Depth 6
You can also open the tenant-list endpoint in a browser. Expect JSON containing code: 200 and data. This pre-login business endpoint confirms the backend responds; it is not a complete system health check.
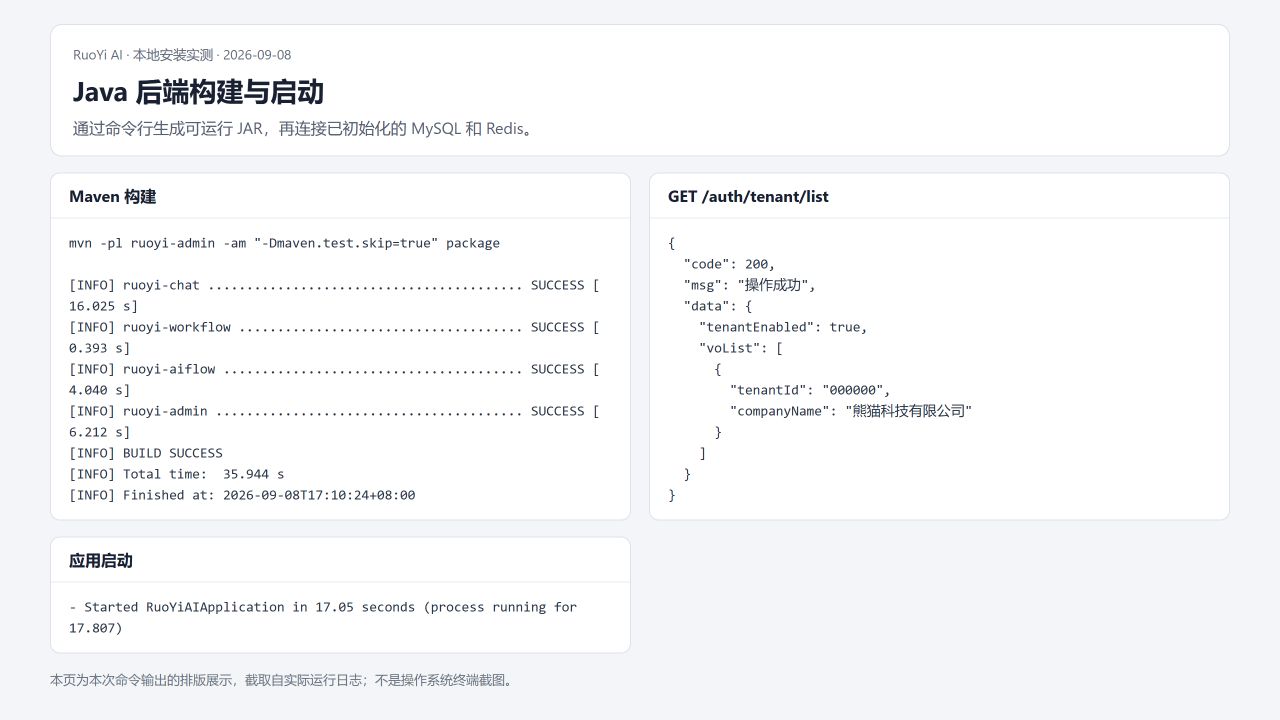
This image formats the recorded build and startup logs, using the isolated backend port 16039. The build and business endpoint succeeded; that does not imply an external model has been configured.
8. Start and sign in to the admin console
8.1 Install frontend dependencies
Open another PowerShell tab and enter the separate admin frontend repository:
Set-Location D:\Project\github\ruoyi-admin
pnpm -v
pnpm install --frozen-lockfile
The admin frontend is a workspace with multiple packages. Install from the root containing package.json and pnpm-workspace.yaml; copying only apps/web-antd is insufficient. --frozen-lockfile installs the pinned dependency versions. If it reports a mismatch, check that code and lockfile belong to the same version.
Wait for installation to finish. Future startups only need the development command unless dependencies have changed.
8.2 Check the backend address and port
Open ruoyi-admin/apps/web-antd/.env.development and check:
VITE_PORT=5666
VITE_GLOB_API_URL=/api
Then check the existing server.proxy configuration in vite.config.mts in the same directory:
server: {
  proxy: {
    '/api': {
      changeOrigin: true,
      rewrite: (path) => path.replace(/^\/api/, ''),
      target: 'http://127.0.0.1:6039',
      ws: true,
    },
  },
},
This is only the relevant fragment; retain the rest of the file. The browser requests /api/...; Vite removes /api and forwards the request to Java. When the backend port changes, update target, not just the admin frontend's own VITE_PORT.
8.3 Start and sign in
pnpm run dev:antdOpen the terminal's address, normally http://localhost:5666. In the recorded environment, startup took about a minute. The first visit may trigger further compilation; wait for it to finish before diagnosing errors.
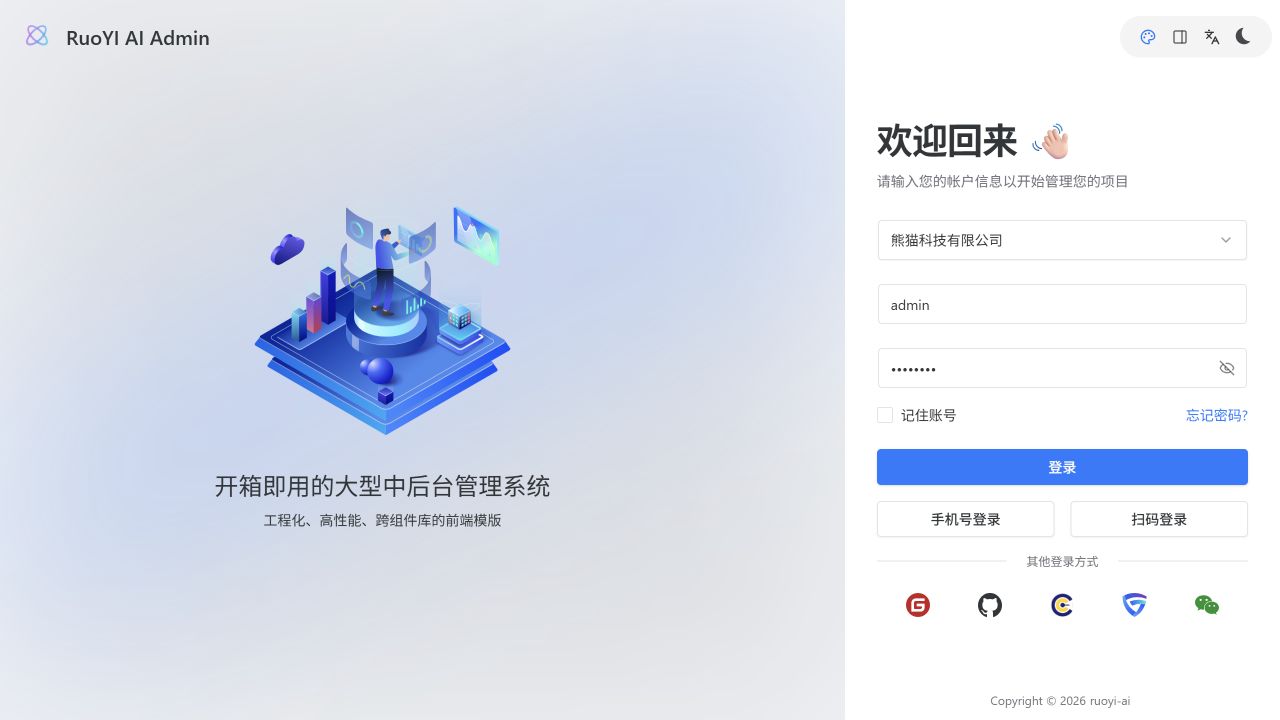
- Select the tenant from the initialization data. The screenshot shows the Chinese name for Panda Technology Co., Ltd.
- Enter username
adminand passwordadmin123. - Complete the CAPTCHA if your version enables it.
- Sign in and confirm you can open the sidebar menus.
admin / admin123 is the application account, separate from MySQL's root account and MinIO credentials.
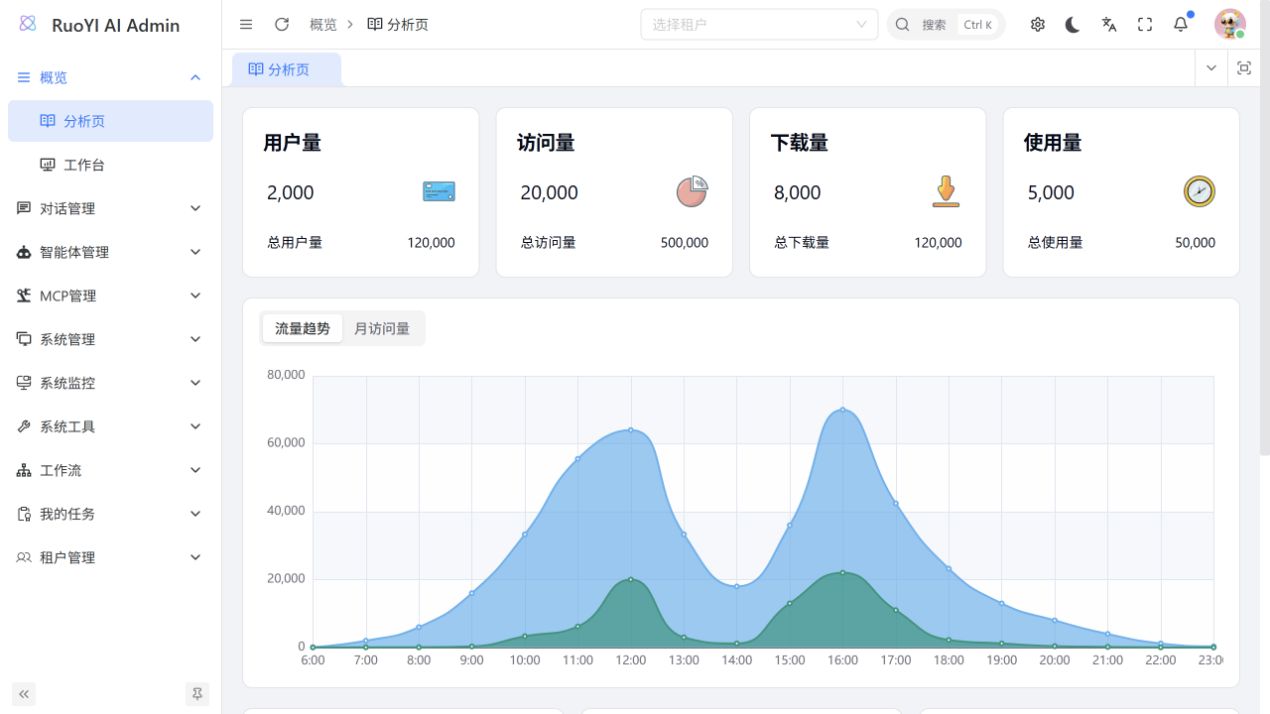
Dashboard charts may contain template data. To verify the connection further, open Chat Management → Model Management and confirm the list loads.
9. Start and sign in to the user app
9.1 Install dependencies and configure the API
Open a third PowerShell tab:
Set-Location D:\Project\github\ruoyi-web
pnpm install --frozen-lockfile
In this repository's .env.development, update VITE_API_URL to the backend address and retain other settings:
VITE_API_URL=http://127.0.0.1:6039The user app calls this address directly. Do not enter the admin port 5666, documentation port 5173, or a full /chat/send endpoint. Restart the frontend process after changing environment files.
9.2 Start on an explicit port
pnpm run dev --port 5180 --strictPort--strictPort reports an occupied port instead of silently choosing another one. Open http://localhost:5180/chat.
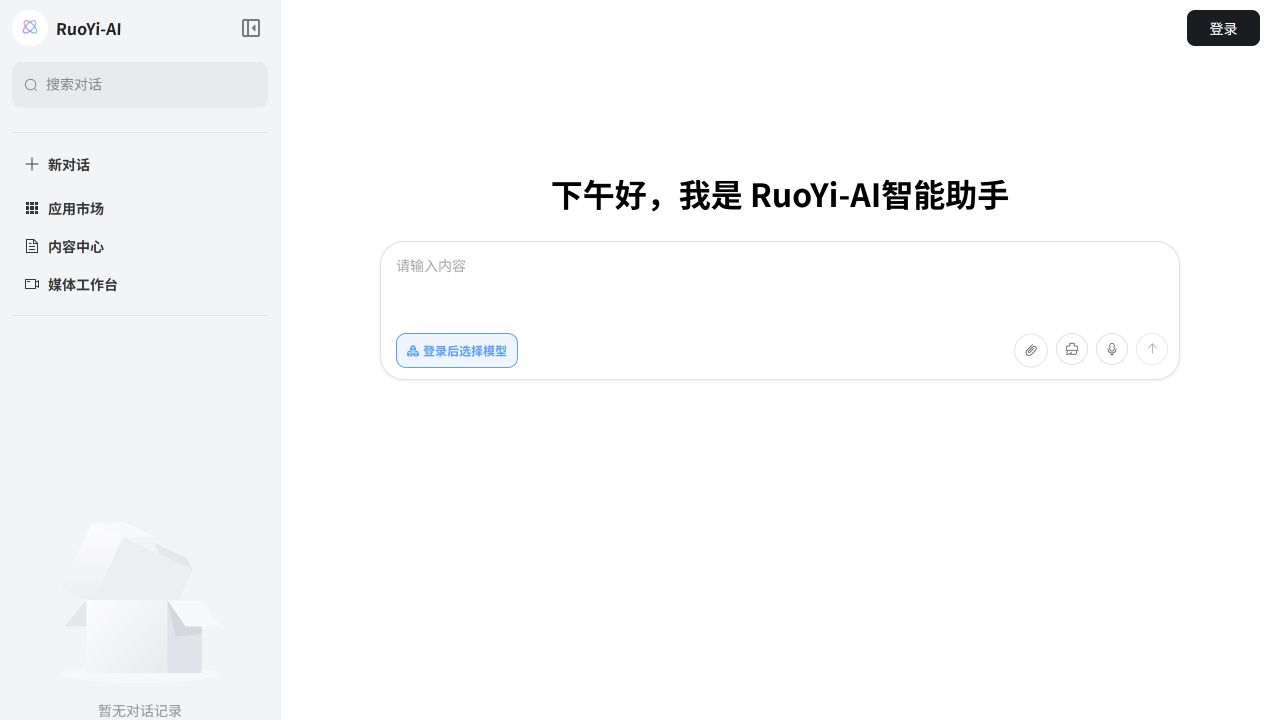
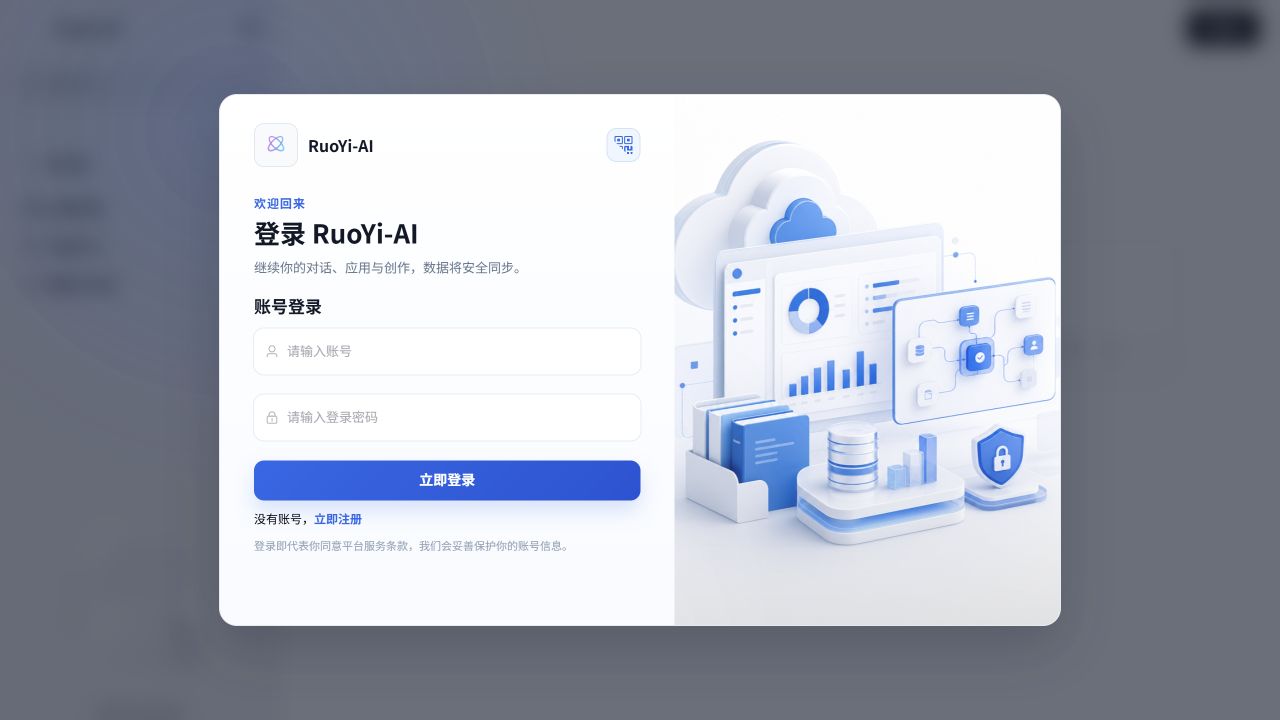
Click Sign in, choose account login, and enter admin / admin123:
After login, the dialog should close, the prompt below the input should change to Select model, and existing sessions should load.
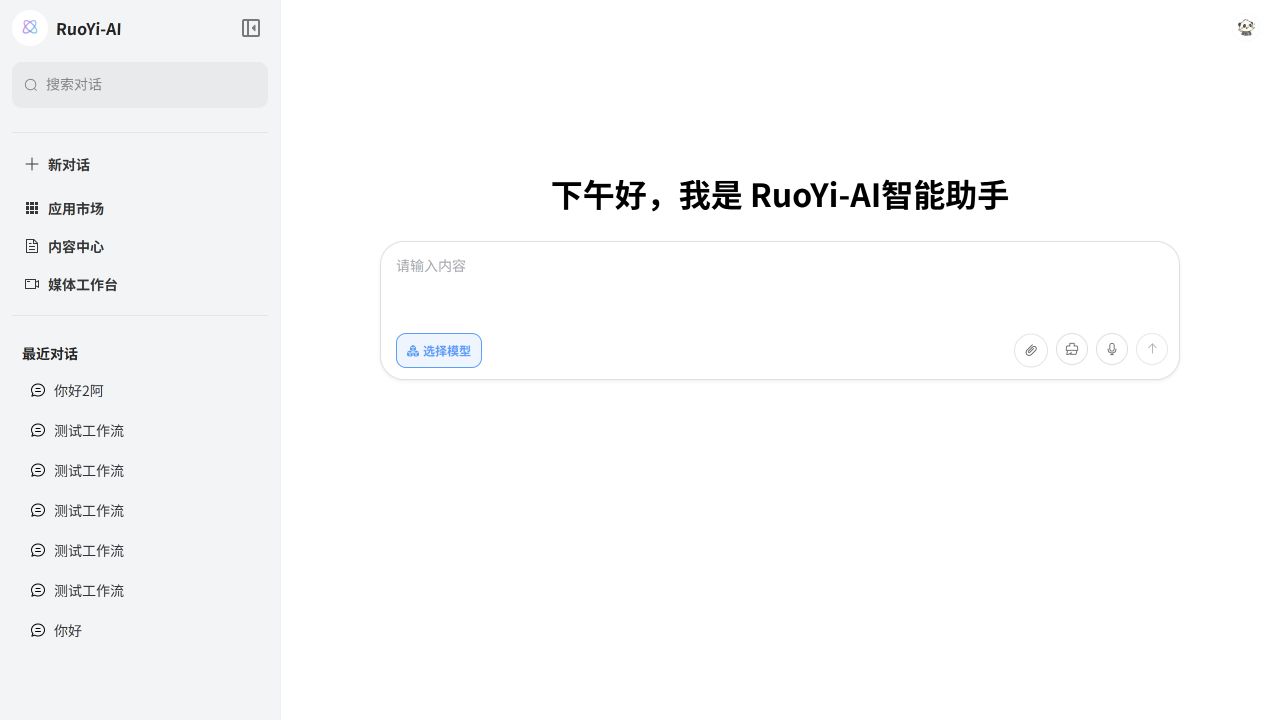
Signing in separately to the two frontends is expected. They run at different addresses but share the backend's accounts and configuration.
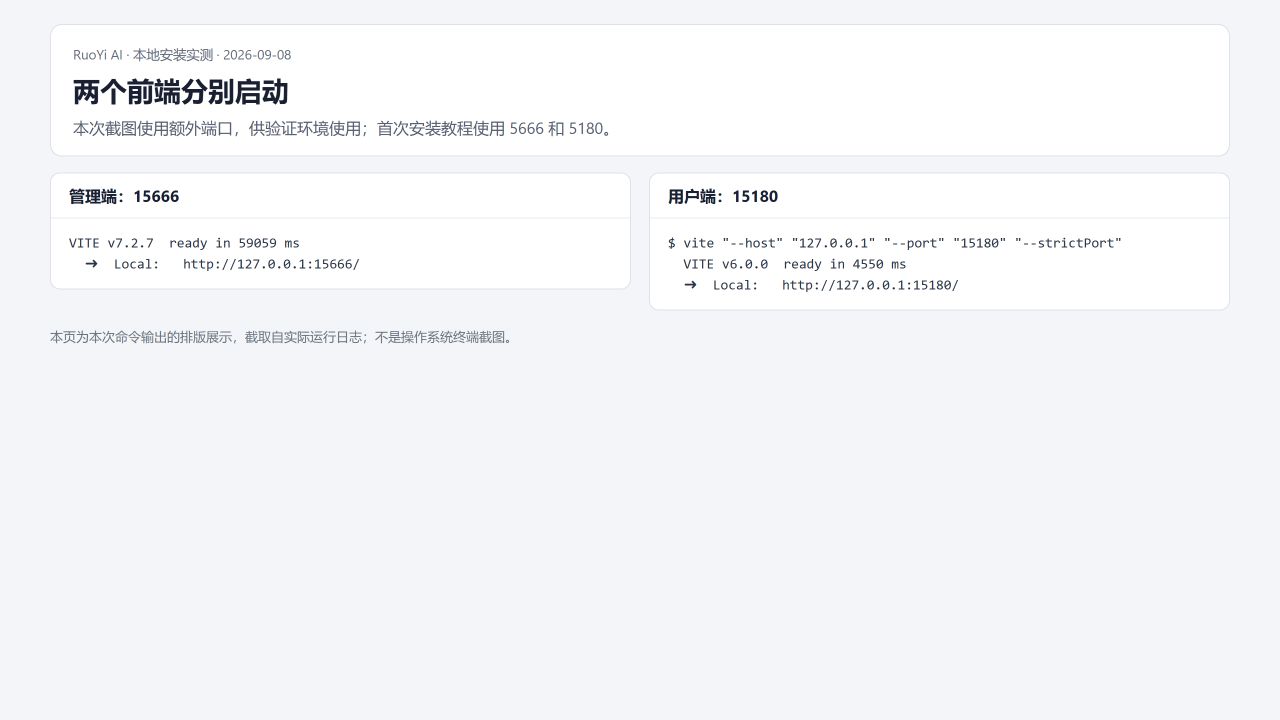
To avoid existing services, these screenshots use admin port 15666, user port 15180, and backend port 16039. Use 5666, 5180, and 6039 in a free environment as shown in the commands.
10. Configure a model and verify your first conversation
10.1 Prepare a service API Key
Create an API Key in your provider console. Enter it directly in ruoyi-admin → Chat Management → Model Management. Model Keys do not need backend environment variables.
10.2 Check the provider and model in the admin console
- Open Chat Management → Provider Management. Confirm DeepSeek exists, is enabled, and has code
deepseek. - Open Chat Management → Model Management and search for the model. Edit an existing initialization record if available.
- Set the category to Chat (
chat) and use a model name supported by both the service and the current adapter. - Enter the real API Key in the model form and check the service address.
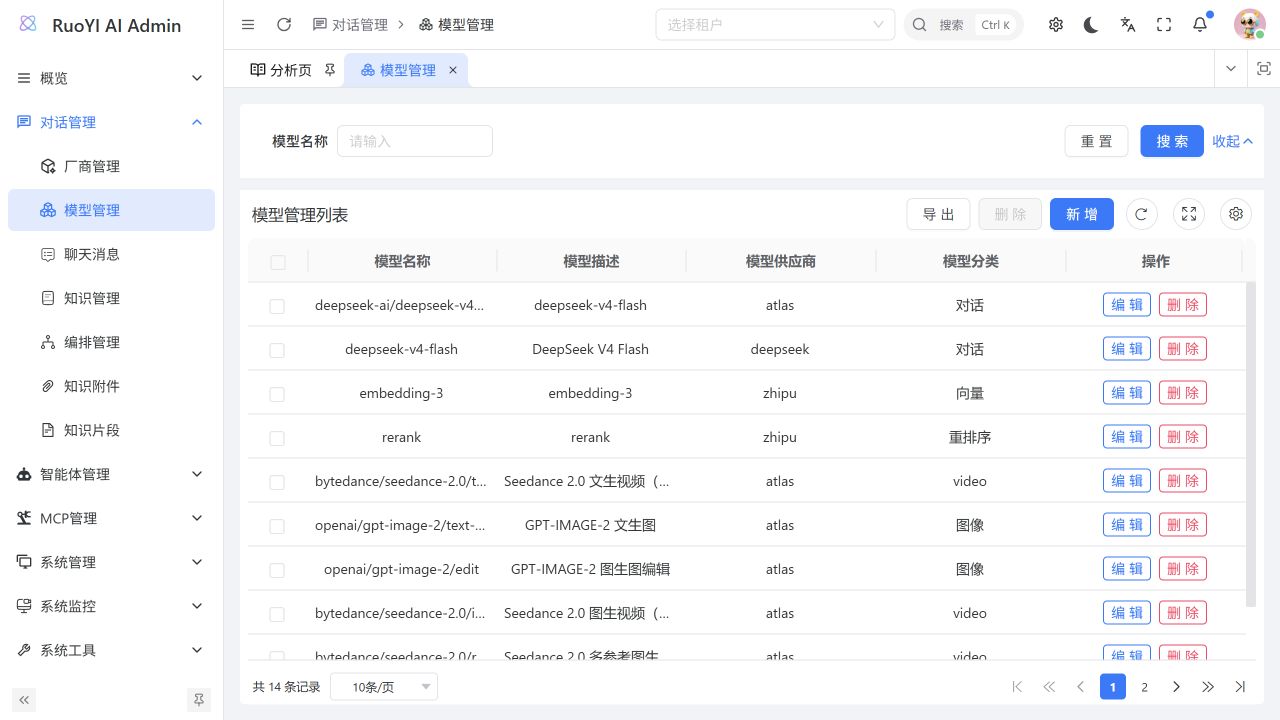
| Field | DeepSeek example |
|---|---|
| Provider | DeepSeek, code deepseek. |
| Category | Chat, stored as chat. |
| Model name | deepseek-v4-flash; confirm your service access and adapter version support it. |
| Description | For example, DeepSeek V4 Flash, displayed in the user app. |
| Service URL | https://api.deepseek.com; check both provider and model settings. |
| Key | The actual API Key from the DeepSeek console. |
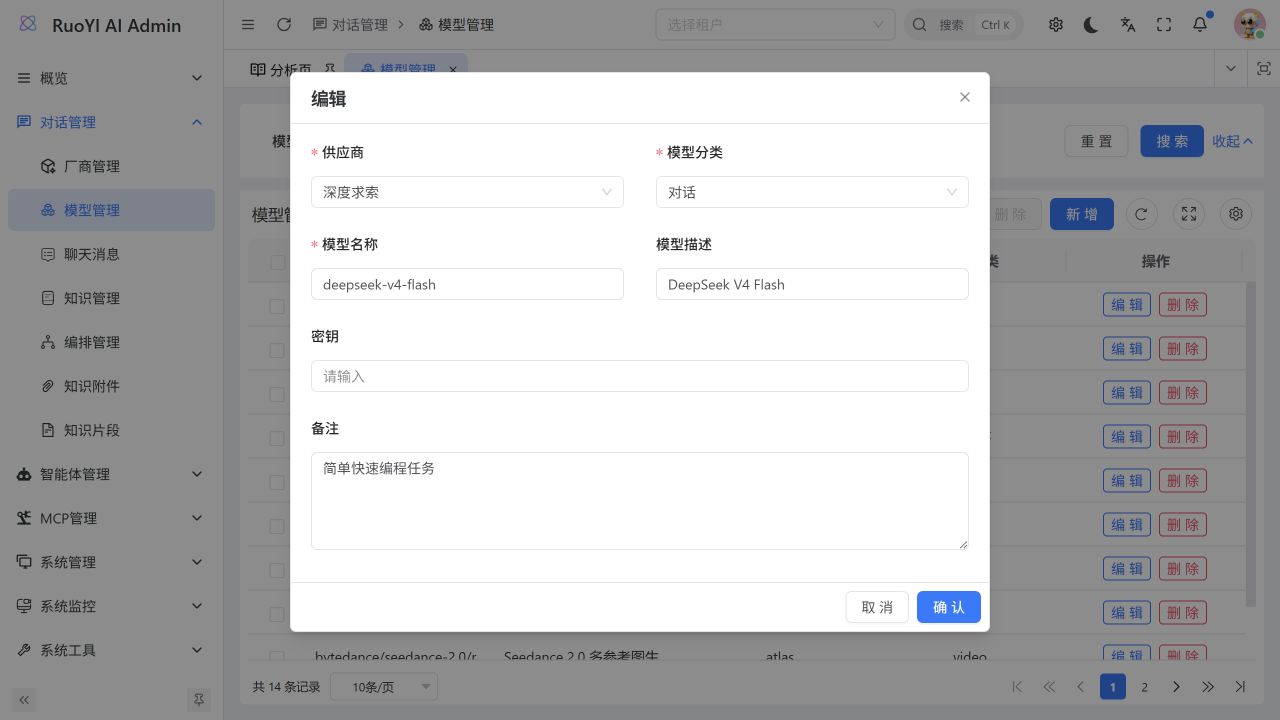
This screenshot shows the configuration entry point. No real key was entered and no model change was submitted during this verification. A model row or a successful form save alone does not prove the model can be called.
10.3 Send a normal chat message
- Start a New conversation in the user app.
- Click Select model below the input and choose the configured chat model.
- Send: “Hello, describe what you do in one sentence.”
- Wait for the answer to finish, then ask: “Please make that shorter.”
- Refresh the page and reopen the session from the sidebar. Confirm the completed exchange remains available.
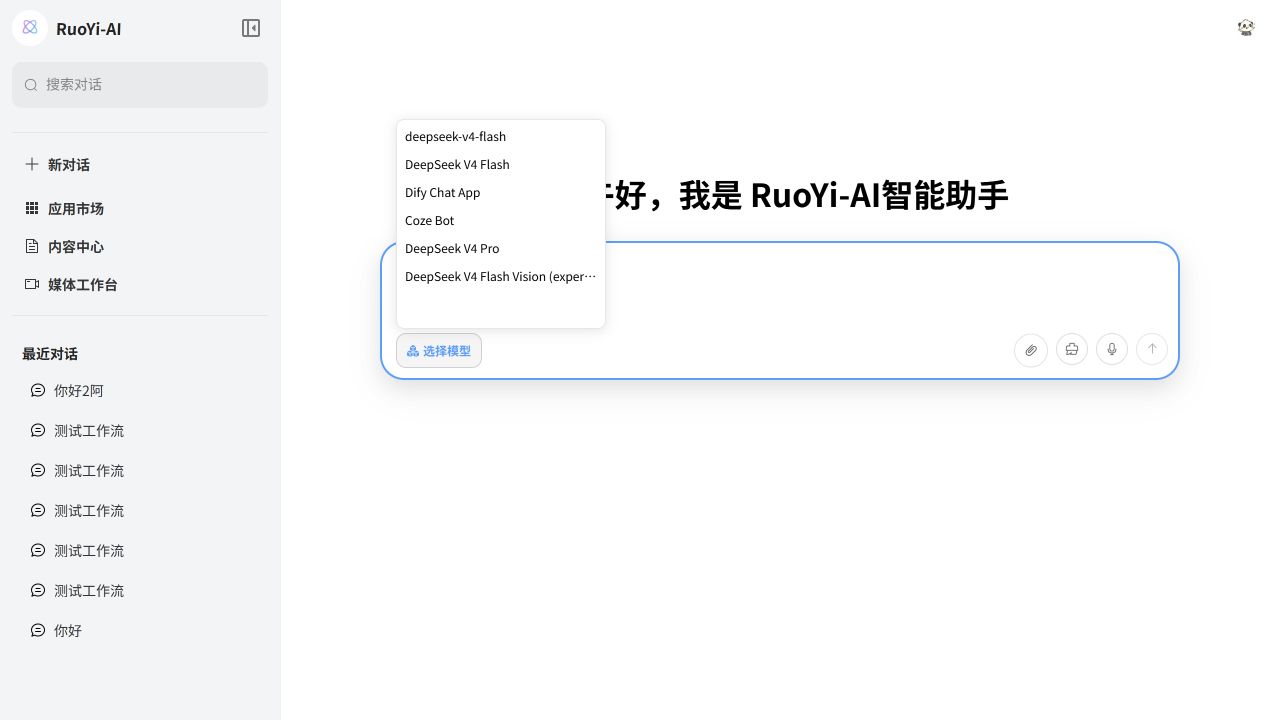
Success requires an actual answer, normal completion, and a session that can be reopened. HTTP 200, an empty session record, or model options alone are insufficient.
The recorded environment had no usable model key, so verification covered login and model-list loading without an external model call. Configure your own model and complete the five checks above.
11. Add file storage and knowledge services (optional)
11.1 Start Weaviate and MinIO
See Weaviate Docker installation for images and MinIO releases for community source and release history. The tutorial Compose file pulls its specified images automatically; no separate Windows installer is needed.
At the backend root, use the Compose file from section 4.1:
docker compose --env-file .dev/.env -f .dev/compose.yml up -d weaviate minio
docker compose --env-file .dev/.env -f .dev/compose.yml ps
(Invoke-WebRequest http://127.0.0.1:28080/v1/.well-known/ready).StatusCode
(Invoke-WebRequest http://127.0.0.1:9000/minio/health/live).StatusCode
The last two checks should return 200. Set backend vector-store.type to weaviate, vector-store.weaviate.protocol to http, and vector-store.weaviate.host to 127.0.0.1:28080. Weaviate stores retrieval vectors; MinIO stores original files.
11.2 Make MinIO the default object store
Open the MinIO console, sign in as ruoyi using LOCAL_MINIO_PASSWORD from .dev/.env, and create a bucket named ruoyi. Console features vary by MinIO version; you can also use the supported mc client. Download Windows x64 mc.exe from the official directory.
In the admin console, open System Management → File Management → File Configuration and edit the MinIO record:
| Field | Local value |
|---|---|
| Service address | 127.0.0.1:9000: the object-store API port, not console port 9090. |
| Access Key | ruoyi in this guide. |
| Secret Key | The value of LOCAL_MINIO_PASSWORD. |
| Bucket | ruoyi. |
| HTTPS | No, for this local HTTP service. |
| Default | Yes. |
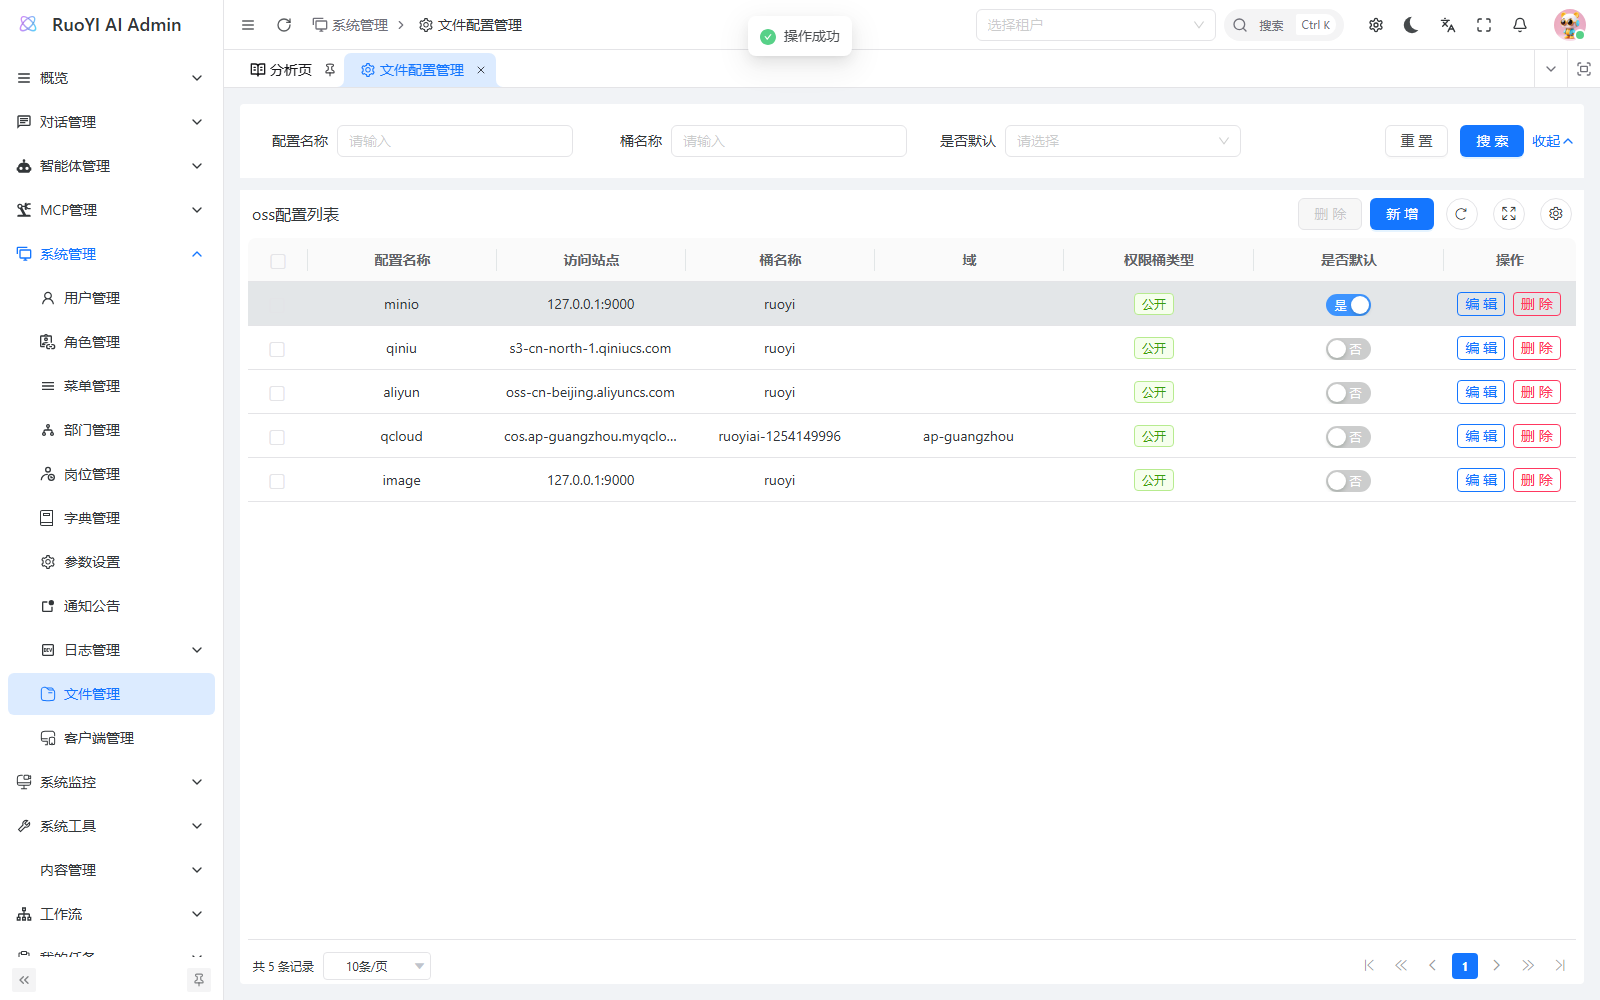
This screenshot comes from an earlier run; MinIO was not started during the recorded basic-installation check. After saving, upload a small file and verify both its list entry and accessibility. Checking the Default switch alone is insufficient. If an external example store such as qcloud remains the default, uploads may hang or fail authentication.
11.3 Local embeddings without an API key (optional)
An embedding model converts text to vectors for retrieval; it is separate from the chat model that generates answers. Install Ollama from the Windows download or other-system downloads, then run in a new terminal:
ollama pull all-minilm:v2Alternatively, with Docker available:
docker run -d --name ruoyi-ai-ollama -p 127.0.0.1:11434:11434 -v ruoyi-ai-ollama:/root/.ollama ollama/ollama:latest
docker exec ruoyi-ai-ollama ollama pull all-minilm:v2
Verify that Ollama itself can generate vectors:
$body = @{ model = 'all-minilm:v2'; input = 'RuoYi AI RAG test' } | ConvertTo-Json
$embedding = Invoke-RestMethod -Method Post -Uri http://127.0.0.1:11434/api/embed -ContentType 'application/json' -Body $body
$embedding.embeddings[0].Count
This example should output 384, the model's vector dimension. See the Ollama embedding API.
Configure Ollama in ruoyi-admin Model Management using a backend-accessible HTTP or HTTPS address and leave the Key empty when authentication is not required. Use http://127.0.0.1:11434 when the backend and Ollama run on the same host; container deployments need a container-accessible address. Ollama adapters do not read the Key, so authenticated gateways need adapter support. See Knowledge-base model preparation. The HTTP check above verifies Ollama itself; after saving the model, also verify embedding calls in the knowledge base.
Once embeddings are connected, follow Knowledge management: create a knowledge base, upload a small file, inspect fragments, test retrieval, and attach it to an agent. Tune hybrid search and reranking after basic retrieval works.
12. Open the backend in IntelliJ IDEA (optional)
12.1 Open the complete backend repository
On IDEA's welcome screen, choose Open and select the ruoyi-ai root containing pom.xml. Wait for Maven import and indexing. You can also open the root pom.xml as described in IDEA's Maven guide.

These two IDEA illustrations come from the earlier guide. Their UI version and paths differ from the recorded command-line environment. Select your own backend root.
12.2 Configure JDK and Maven
- Under File → Project Structure → Project SDK, select the installed JDK 21.
- Under Settings → Build, Execution, Deployment → Build Tools → Maven, select the Maven 3.9.x installation directory without its final
bincomponent. - Check that the Maven Importer and Runner use the same JDK as the project, then reload Maven.

If terminal mvn -version is correct but IDEA builds fail, check these IDE versions before changing system Path.
12.3 Run the entry-point class
Open:
ruoyi-admin/src/main/java/org/ruoyi/RuoYiAIApplication.javaCreate a Java Application run configuration:
| Setting | Value |
|---|---|
| Main class | org.ruoyi.RuoYiAIApplication. |
| Module / classpath | The backend's ruoyi-admin module. |
| JRE / JDK | JDK 21 used by the project. |
| Working directory | D:/Project/github/ruoyi-ai, replaced with your backend root. |
| Program arguments | --spring.profiles.active=dev --spring.config.additional-location=file:./.dev/application-local.yml. |
| Model API Keys | Configure directly in ruoyi-admin Model Management. |
Stop a command-line backend using the same port before clicking Run. After startup, check the endpoint in section 7.3. The IDE does not initialize the database or start either frontend automatically. See IDEA Application run configuration.
13. Stop, restart, and update
13.1 Stop services temporarily
Press Ctrl+C in each application terminal. With the tutorial Compose file, stop infrastructure from the backend root:
docker compose --env-file .dev/.env -f .dev/compose.yml stopVolumes are retained. Normal shutdown does not require deleting databases or volumes or importing SQL again.
13.2 Start again later
Start Docker Desktop and the required infrastructure, then start the three applications in separate terminals:
# 基础设施,在后端根目录执行
docker compose --env-file .dev/.env -f .dev/compose.yml up -d mysql redis# 终端 A:后端。模型 Key 在后台管理中配置。
Set-Location D:\Project\github\ruoyi-ai
java "-Dfile.encoding=UTF-8" -jar .\ruoyi-admin\target\ruoyi-admin.jar --spring.profiles.active=dev --spring.config.additional-location=file:./.dev/application-local.yml# 终端 B:管理端
Set-Location D:\Project\github\ruoyi-admin
pnpm run dev:antd# 终端 C:用户端
Set-Location D:\Project\github\ruoyi-web
pnpm run dev --port 5180 --strictPortFor knowledge-base use, add weaviate minio to the infrastructure service list. For native MySQL and Redis installations, simply confirm their services are running.
13.3 When to rebuild
| Change | Next action |
|---|---|
Java code or application*.yml packaged inside the JAR | Rebuild with Maven and restart Java. |
.dev/application-local.yml or backend environment variables | Restart Java; provide variables to the new process. |
Frontend .vue files or regular styles | Development mode usually updates automatically; inspect logs if it does not. |
Frontend .env or Vite settings | Restart that frontend. |
package.json or lockfile | Reinstall with the matching lockfile, then start. |
| Database-schema-related code | Back up, inspect and apply applicable migrations, then start. |
14. Troubleshooting by symptom
| Symptom | Check and action |
|---|---|
java, javac, or mvn is not recognized | Check installation paths and Path, reopen the terminal, and try the full executable path. |
release version 17 not supported / invalid target release | Maven is using an older JDK. Inspect its runtime with mvn -version and IDEA's Maven JDK. |
PowerShell blocks pnpm.ps1 | Use pnpm.cmd, or npm.cmd to install pnpm. |
Maven remains on Downloading or cannot fetch dependencies | Check the failing repository URL, proxy, and settings.xml. Cache coverage affects duration; do not delete all of .m2 at once. |
| Maven cannot find a project, module, or POM | Run from the backend root and confirm the checkout is complete. |
Unable to access jarfile | Confirm BUILD SUCCESS, the correct JAR path, and the backend-root working directory. |
| Docker reports only Client or cannot reach the engine | Start Desktop and check WSL 2, Linux containers, and engine status. This is a container-environment issue. |
Docker Desktop reports a dockerInference listener error | This prevented container verification in the recorded environment. Retain data and follow Docker troubleshooting; native MySQL and Redis can be used to verify basic startup meanwhile. |
MySQL Access denied | Check instance, port, username, and password. A new Compose .env password does not change an existing volume's password. |
Unknown database 'ruoyi-ai' | Import was not applied to the backend's database instance, or its configured database name differs. Connect to the same address and port to check. |
| SQL import reports existing tables or databases | Check whether a full initialization was mistakenly used for an upgrade. Back up and use applicable incremental scripts. |
MySQL Communications link failure | Check readiness, address, and port by connecting to MySQL independently. |
Redis Connection refused | Check that Redis is running on the configured port; use redis-cli ping. |
Redis ERR AUTH ... without any password configured | Java sent AUTH to passwordless Redis. Remove empty strings, old passwords, or inherited variables; omit the setting when no password is configured. |
| Backend settings have no effect | Check that startup loads .dev/application-local.yml and that environment variables or command-line arguments do not override it. |
Port 6039 was already in use | Stop your previous instance or choose another port and update both frontends. |
| No tenant on the admin login page, or HTTP 502 | Check the tenant endpoint, then the admin /api proxy. A loaded frontend does not prove Java is healthy. |
| User app fails while admin works | Check the user app's separate VITE_API_URL and restart it after changes. |
| Brief blank page on the first user-app visit | Wait for Vite compilation and use the terminal's URL. If it persists, inspect the browser console and frontend logs. |
ERR_PNPM_OUTDATED_LOCKFILE or missing workspace packages | Install at the repository root with its pnpm version and matching code/lockfile. Do not mix npm installation into the admin workspace. |
| A model is selectable but gives no answer | Check the backend process's key, model name, provider status, and API response. Example records do not grant service access. |
| Ollama self-check succeeds but knowledge-base embedding fails | Check the model category, model name, and backend connectivity to Ollama. Inside a container, 127.0.0.1 refers to that container. |
| Upload hangs or authentication fails | Check the default store, MinIO address, bucket, and credentials; remove reliance on external example settings. |
Unknown column 'file_hash' or missing fid | Apply the relevant RAG migration after checking scripts and columns in section 5. |
| SQL agent has no queryable tables | Configure allowed business tables in the agent guide. This is separate from basic login. |
Tenant expiration dates
With tenant.enable: true, a super administrator with tenant-management permission can create tenants. The expireTime field in POST /system/tenant uses yyyy-MM-dd HH:mm:ss, for example 2027-09-11 00:00:00; omit it or send null for no expiration. Dates without a timezone use the backend runtime timezone. Supply an existing package ID as packageId, preferably as a string to preserve large-integer precision in browsers.
The backend uses Spring's configured Jackson builder to retain global date formatting and custom modules. Preserve those settings when extending ObjectMapper so tenant requests and workflow JSON keep consistent serialization behavior.
15. Confirm installation is complete
| Check | Success criterion |
|---|---|
| MySQL | The correct instance is accessible and contains ruoyi-ai tables and the admin account. |
| Redis | PING at the backend's configured address returns PONG. |
| Backend build | Maven reports BUILD SUCCESS and produces ruoyi-admin.jar. |
| Backend runtime | Startup completes and the tenant endpoint returns JSON with business code: 200. |
| Admin console | The initialized account can sign in and load models. |
| User app | Login, new conversations, and model options work. |
| Model chat | A configured, authorized model returns a complete answer, and the saved session can be reopened. |
| Knowledge base, if needed | Weaviate and MinIO are accessible; uploads parse and retrieval finds the content. |